

PAN or Permanent Account Number, is a unique identification number for those Indians who are usually taxpayers. All tax details of an individual are recorded against their PAN number. Furthermore, no two entities can have the same PAN number. The benefits of a PAN card is also valid for the entire lifetime of the PAN holder. This happens because PAN remains unaffected by any change of address of the PAN holder.
Section 139A of the Income Tax Act, 1961, states that any individual who earns over Rs 2.5 lakhs or has a business of Rs 5 lakh worth of gross turnover, should have benefits of PAN card. It is also necessary for those who earn less than Rs 2.5 lakh but need a PAN card to complete certain undertakings. PAN is a unique alphanumeric, 10-digit number imprinted on a laminated plastic card. Individuals, Firm, Company, Association of persons, Body of Individual, Hindu Undivided Family, co-operative society, Government Agencies, Artificial Juridical Person, Local Authority, Limited Liability Partnership, Trust and all those whose income is taxable under the Income Tax Act, 1961 need to acquire a PAN Card.
Table of Contents
10-digit structure of a PAN card:

- The first 3 characters are alphabetic and range between AAA to ZZZ.
- The fourth character indicates the status of the PAN card holder, as follows:
- “P” stands for Individual
- “T” stands for Trust
- “C” stands for Company
- “G” stands for Government Agency
- “H” stands for Hindu Undivided Family
- “A” stands for Association of person
- “B” stands for Body of Individuals
- “J” stands for Artificial Juridical Person
- “L” stands for Local Authority
- “E” stands for Limited Liability Partnership
- “F” stands for Partnership Firm, and so forth.
- The fifth character represents the PAN card holder’s last name or surname in case of individual and for non-individuals’ first character of PAN holder’s Name. This does not change if an individual’s surname changes post marriage.
- The sixth to ninth characters are numerical, ranging between 0001 and 9999.
- The tenth and last character is an alphabet which occurs by applying a formula on the first nine numbers.

Steps to Apply for PAN Card Online:
- To have a hassle-free application, first, open Google and type “PAN Card online application”. This will open various links but you need to select “Online PAN Application NSDL“. Now you have entered the PAN card online application page. Remember you have to make a payment of Rs 106 that can be easily paid online.
- Once you click on the link, you will be forwarded to a very simple page. If you have any experience of filing up a form earlier, then this form will be a cakewalk for you! So let us begin with the steps below.
Step 1:
Click on the first block saying ‘Application Type’. Select New PAN Indian Citizen (form 49). Second, go to the Category bar and choose ‘Individual’. If you have any other requirements, you can choose the other categories.
Step 2:
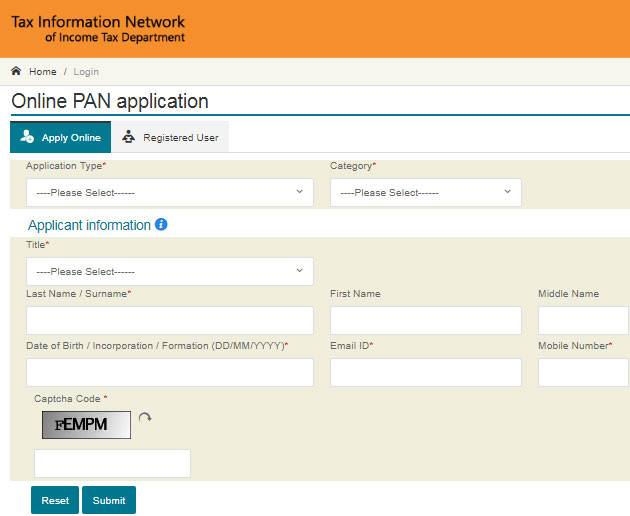
Go to the next section, click on the Title as per your marital status. Select the preferred title, and move on to fill in your name, middle name, last name, email id, mobile number and date of birth. Fill in the CAPTCHA and click on the submit button.
Step 3:
You will get a Token Number and the same number will be sent to your given email id. This number will help you recover your application if by chance the page becomes unresponsive. You can continue the form by signing in with the token number.
Step 4:
After receiving the Token Number you will be taken to the next page that entails 5 descriptions upon which your application will be complete.
Next, click on the category Submit digitally through e-KYC & e-Sign (Paperless). Upon clicking, you will see there are a few questions below.
For the question – Whether Physical PAN Card is required? click on the option – YES (fees applicable), and for this, you have to have a minimal amount. The next step is to fill in the Aadhar Number. Upon filling the number, your name and details on the Aadhaar card will be automatically filled.
Below, you will see all your personal data already filled so just cross-check the data and go on further to fill your Gender. Next, you will come across the question ‘Have you ever been known by any other name?‘ Click on YES or NO according to your preference.

Step 5:
Fill up the details of parents and go ahead for the next page which entails source of income information. As per your occupation type, click on either Salary, Business, Income from House or Property, Income from other sources, Capital Gains, or No Income. You can also choose multiple options as per your working scenario. If you are a student who wants to make a PAN card for future reference and use select No Income.
Step 6:
Address for communication must be filled properly with all the right details. If you have filled in the Aadhaar card then, the residential address will automatically reflect on the screen. In addition, if you have an office address, then you can fill that space as well.
Step 7:
The application will ask for your telephone number and email id details. For the number, select the country. Then, fill in your mobile number or landline number.
Step 8:
You will see a block saying ‘Appointee Representative Assesse’. It means that you can appoint someone who has proper knowledge about your income and can help you pay your tax. In case, you are unable to file your taxes and you do not have anyone and want to pay your taxes on your own, then click on the NO button. After this step, go ahead and click on the Next button.
Step 9:
You can see there are blocks asking for Area Code, AO type, Range Code, AO number. To follow this step, click on the Indian Citizen bar, on the drop-down menu, choose the state and city. After your selection, below on a table, you can find many AO’s with respect to the location. Scroll down to search your area and select it.
Step 10:
After completing the previous steps, you will be taken to the page regarding ‘Document Details’. The first bar asking for Proof of Identity will automatically fill itself. Additionally, on the declaration part, you need to select on the bar stating ‘Himself’. Choose the place and click on submit.
Step 11:
Finally, the last step is to pay for your application. You can complete the payment via Demand Draft or Net Banking. The online payment methods include all the gateways that you can choose according to your preference. Starting from debit cards and credit cards to e-wallets as well. After the completion of the payment, you will be forwarded to a screen where you have to simply click on the ‘Continue’ button.
Step 12:
Moreover, you need to put in your Aadhar OTP and it will arrive at the mobile number which links to the card. The application will auto-submit and you will receive your PAN Card after some days at your residence.
So, these simple steps will help you to apply for your PAN Card online and you can also watch our video on it below.
Benefits of having PAN CARD:
- If you have a PF account and it is not linked to your PAN then you will be charged 34% TDS on your PF withdrawal. Furthermore, if you link your PAN to your PF account then only 10% TDS is deducted which you can reclaim later while filing your income tax returns. Find the full process of linking your PAN to your PF account here.
- If you are opening a new bank account and filling the application online for it, then most banks have made it mandatory to submit PAN details.
- If you are depositing more than Rs 50,000 at one go at the bank then you need a PAN card.
- If you are planning a foreign trip then you need to submit your PAN details for any transaction that is above Rs 50,000, such as currency exchange or ticket booking.
- Benefits of Pan Card is mandatory for applying for a credit card of any bank.
- If you are purchasing anything which is above Rs 2.5 lakhs then you require a PAN card.
- If you wish to go into investments such as mutual funds, PPF, shares, debentures, etc., then you will need a PAN.
- If you are making a fixed deposit of Rs 50,000 at one go or that fixed deposit is over Rs 5 lakh annually then you need to submit PAN details.
Watch the detailed video below:
Another important thing to know is how to generate your UAN from your Aadhaar which you find here.
Suppose you made your PAN card before making your Aadhaar card and the details you provided while making your PAN card were incorrect. There might be a change in your address or your picture has been printed wrongly. How to rectify this kind of mistake easily? We shall explain to you, in a step by step tutorial for PAN card correction.
Steps For Online PAN Card Correction
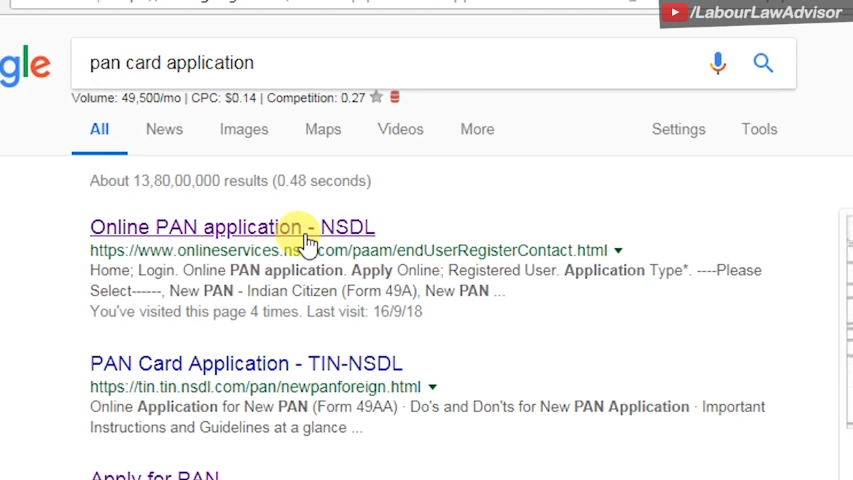
- For the purpose of your PAN card correction, firstly you have to search for PAN card application on Google. We have attached a picture of this below as well to help you understand.
- Click on the first link named Online Pan Application NSDL
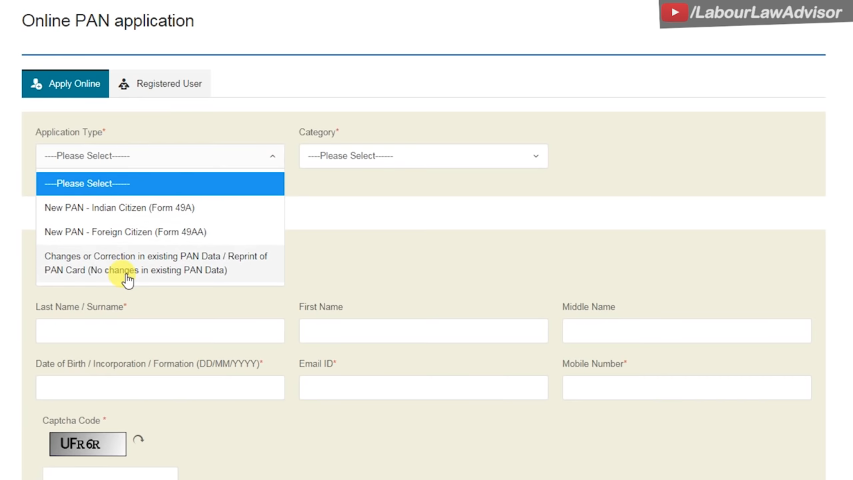
- Now open the application. Focus on the application type.
- Here you will get three options. The two options are for new PAN and the second is for changes or corrections in existing PAN data. You have to click the second option.
Application Information:
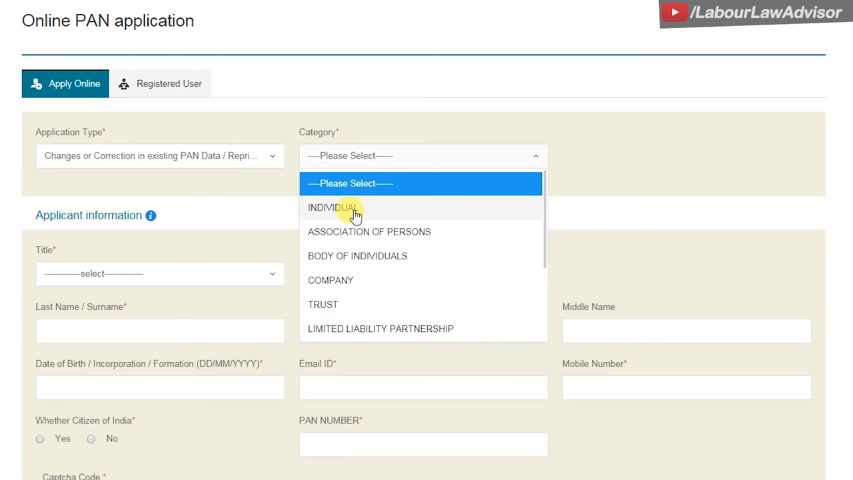
- After that, you have to choose the category. There are several options in this section such as Individual, Association of Persons, Company, Body of Individuals, etc. Here we are choosing the option of Individuals.
- Next up is the option for Title. The options for it are Shri, Smt and Kumari. If you are male then select the Sri option. If you are a married woman then select Smt. else select Kumari.
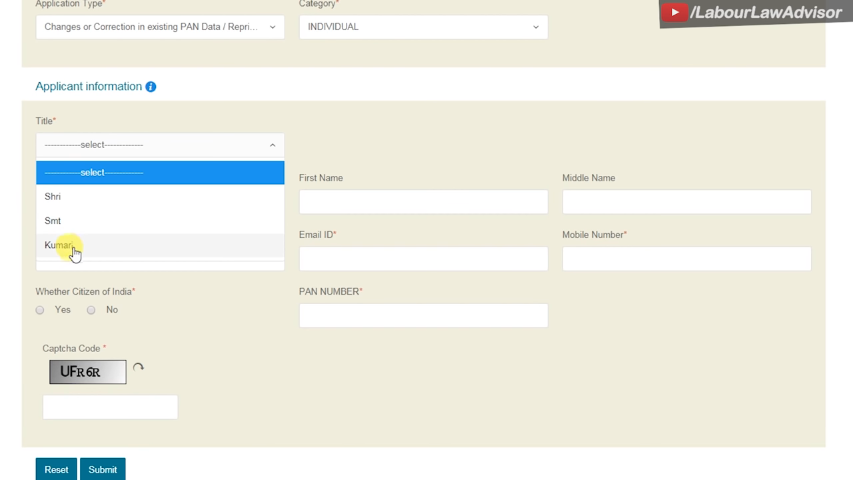
- On the next parameter enter your last name, first name and any middle name if you have one.
- Fill in your date of birth, email id and contact number.
- For the question, “Whether
citizen of India?”, click on YES. - For parameter PAN number, put in your details.
- Next, fill in the Captcha Code and continue to click on the Submit button.
Token number:
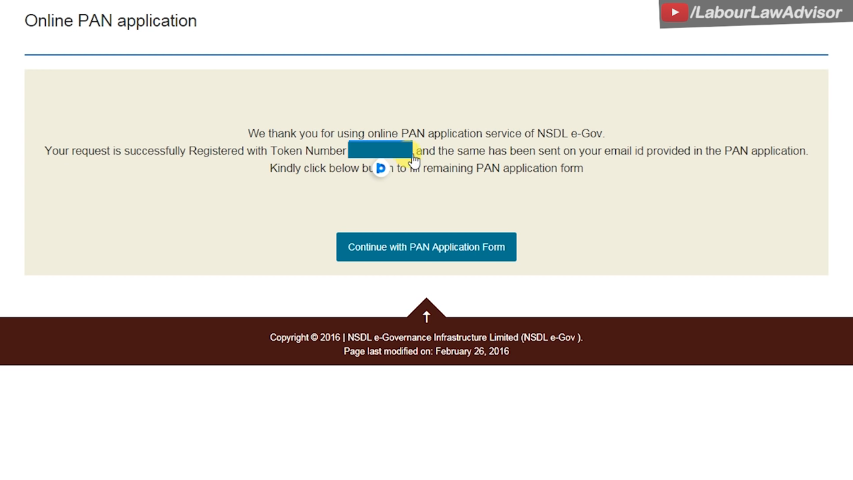
- Upon submitting you will receive a token number. Using this token number you can access the upcoming pages of the form. Suppose your internet connection lost midway during filling the form or the data has been lost, in such cases, the page can vanish. Thus, you can access the same form by the token number. Thus, you will not have to fill the details again. So do note down the token number. You will also get the token number sent automatically to your email id.
Continue with PAN application form:
- Click on Continue With Pan Application Form, to complete your submission.
- For the next question, “How do you want to submit your PAN application documents?”, there are three options as follows:
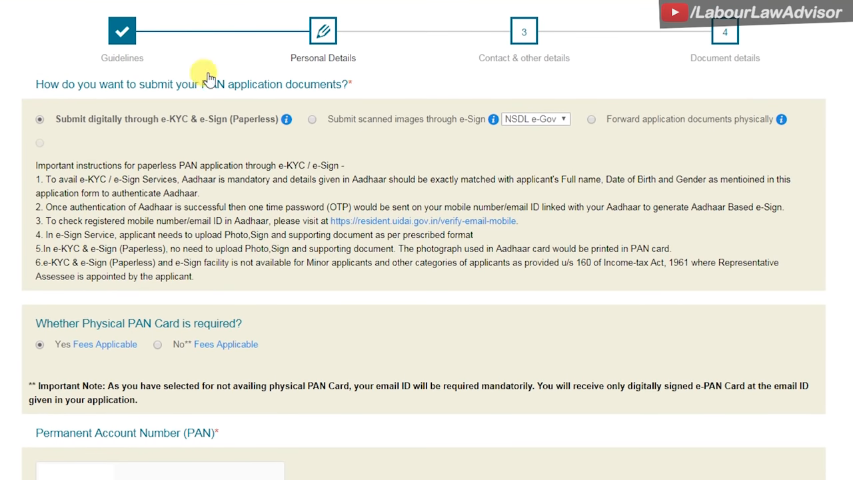
1. Submit digitally through e-KYC & e-Sign (Paperless):
In this process, you do not need to upload any documents. Also, you do not need to send any documents to the PAN authority by post. Once you complete the form-fillup process, that is the end. After some days your PAN card will come by post to your residential address. This new PAN card will have your correct details.
2. Submit scanned images through e-Sign:
If you choose this option then your PAN card will come with your signature printed on it. By clicking this, you will get the option to upload your photo and signature. When you upload them, you will get your PAN card with your photo and signature.
In the first e-KYC option, your PAN card will not have your signature. It will only have your photo which will be taken from your Aadhar card.
3. Forward application documents physically:
For this option, you fill your form as well as your basic details. Thereby, any other documents, need to be attested, photocopied and mailed by post to the department.
- For this process, we select the first paperless option. Here you will get an option of whether physical PAN is required where we clicking here the Yes option.
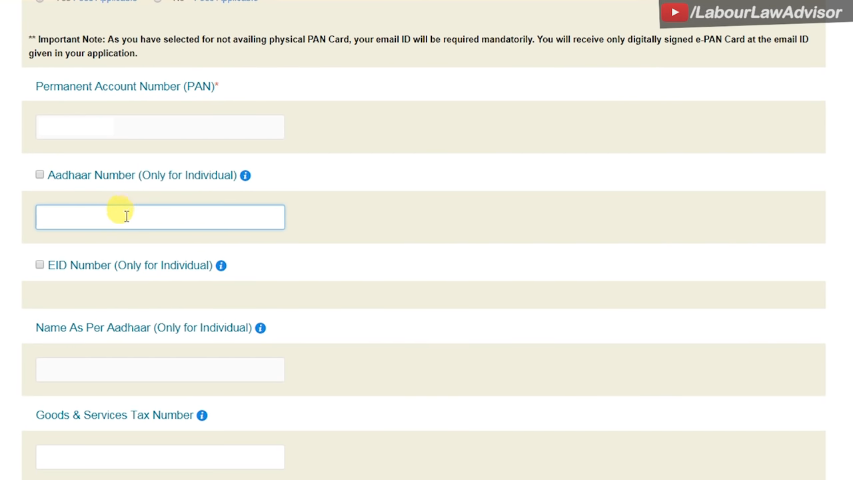
- After that, you will get some other details which you have to fill. If you do not want to correct any specific detail then do not tick mark on that relevant box. Just tick the boxes which you have to correct.
- Also, just fill in your details in the other boxes without marking a tick. Here we are filling the Aadhaar number. Name as per Aadhaar will not come because it will be taken from the Aadhaar number directly. If you have your GST number and you are making your PAN for your company, then fill in the GST.
Photo mismatch or signature mismatch:
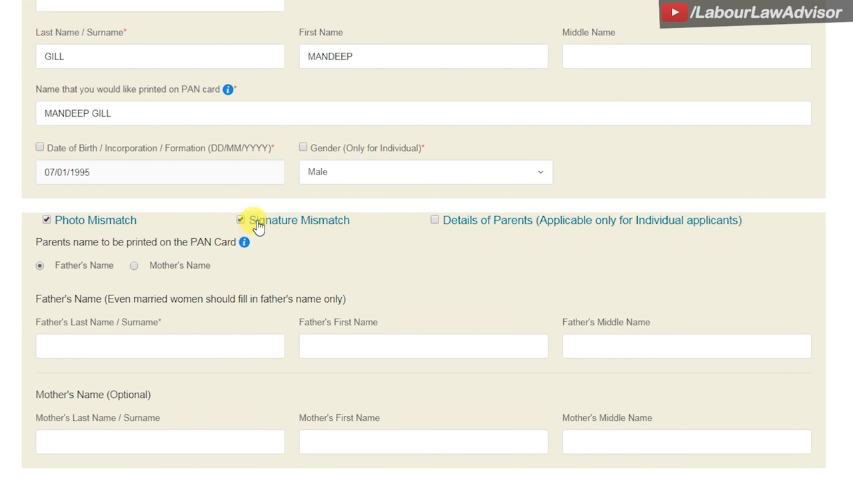
- If your PAN card has wrong photos or wrong signature you can change it by giving a tick for these options.
- There is another option for Details of Parents. Select the option for either father’s name or mother’s name. The mother’s name is optional and it depends on your wish whether you want to fill it or not.
- Click on Next.
Applicable residence or office:
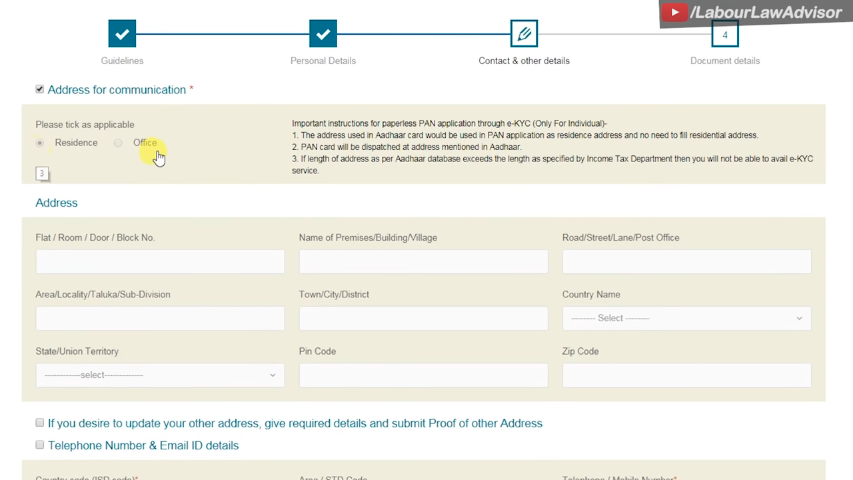
- Select the residence option.
- You can not fill the address option because it will be taken from the Aadhaar number you have linked.
- You can fill more than one address like residence or office.
- Here it is written that if you desire to update your other address then give the required details and submit proof of other addresses. For providing the address proof you have to submit some scanned copy of original documents.
- The next option is telephone number and email id details. If you want to change it tick mark here. After marking tick select your own details.
- For the country section, we select India and fill the STD code section. The telephone number option is already provided here.
- If you want to fill any new email id then fill it. If you do not want any changes in the details then do not tick this option.
- Also, if you have more than one PAN number you can fill them too.
- Then click on the Next button.
Documents submitted as Proof of Identity (POI), Proof of Address (POA) and Proof of Date of Birth (DOB):
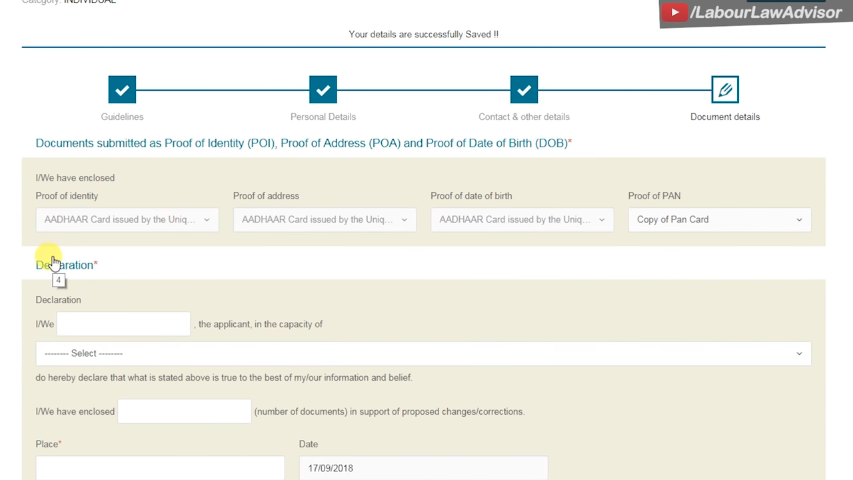
- In this section, you can not submit the documents. You can only submit the proof of PAN because I have to provide the proof of the old PAN card. The rest of the proof will be taken from the Aadhaar card.
Declaration:
- For “I the applicant in the capacity of”, you have to fill your name. The option in the capacity of is written as Himself of Herself. Select the option accordingly.
- Fill how many documents you have given to the PAN department for the purpose of correction.
- In the place option, you have to fill your city.
- Select the date of form submission.
- Then click the Submit option. You will get to see the full form. By which you can check it again whether it is wrong or right. If there is any wrong detail you can correct it.
- Finally, you have come to the last part of the form. Click the Proceed button.
Mode of payment:
- You will get two payment options as follows – online payment or demand draft. If you pick the online payment option, you have to pay Rs 106.9.
- Click on “I agree” option and go through the “Proceed to Payment option.
- After successful payment, you have to click the option of authenticating OTP. You will receive an OTP on your Aadhaar linked mobile number. You have to enter the OTP. Finally, you have to verify the form.
- After a few days, you will receive a new PAN card at your residential address.
Here is a step by step tutorial for the entire PAN card correction process:
Join the LLA telegram group for frequent updates and documents.
Download the telegram group and search ‘Labour Law Advisor’ or follow the link – t.me/JoinLLA
It’s FREE!
